
Using a Custom Domain with an Azure WebSite

As a follow up to the previous post on migrating your existing WordPress.com site to Azure Websites, this post will cover how to apply a custom domain for your Azure Website so that you don’t have to deal with that pesky trailing ".azurewebsites.net" in your URL.
What do you need?
You’ll need the following things to start this process :
- An Azure Website that is up and running.
- A Domain that you want to target for your site.
- A few dollars to spend as you’ll be migrating from the Free section of Azure.
If you have those things (or are prepared to have those things), then you should be able to get your custom domain working in no time.
Rockin’ in the non-Free World
One of the restrictions of Azure Websites in the Free Web Hosting Plan (default) is that it lacks the ability for you to use your own domain. So the first thing that you are going to need to do is establish a new hosting plan within Azure.
Log into your Azure Web Portal and select the site that you want to apply this domain to. Shortly after logging in, click the Scale tab that appears along the top menu. Clicking Scale will present you with various settings regarding how to scale-out your application or site as seen below :

You can choose any of the available options (Shared, Basic and Standard) as all of these support custom domains. Your preference will really just depend on the level of traffic that you are expecting and how much you want to pay. For the purposes of this example, we will use Standard, but the steps should still apply for both Shared and Basic.
Get Your Domain Talking to Azure
Generally, I have used namecheap.com in the past for my domain and the name of their site alone can let you know why. Their service and support has always been extremely helpful and the entire process of purchasing a domain from them was quick, painless and (again) cheap. This section of the tutorial will use namecheap.com’s interface, which leaves a bit to be desired, but the general concepts should apply to any domain provider that you would be using.
After updating your hosting plan, you will want to visit the Configure tab within the Azure portal for your site. You’ll see quite a few settings and configurations related to your site, but continue going until you see Domain Names :

Clicking the Manage Domains button will present you with the following dialog that will mark the beginning of a few steps of bouncing between your Azure site and the DNS settings of your domain provider (e.g. namecheap.com) :

Keep this dialog open and open a new tab within your browser. In this new tab, log into the site that manages the custom domain that you are going to be using for this Azure Website. Once you have logged in, you’ll want to go into the Manage Domains area (if applicable) and look for an area that allows you to define your DNS settings for the site (it’s called “All Host Records” on namecheap.com) :

Clicking on this area (or its equivalent within your domain provider) should present you with an area that looks like the following :
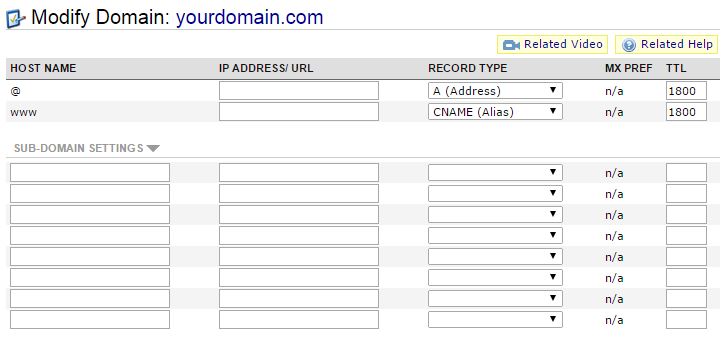
Within here, you are going to need to add the following entries :
- Add an A (Address) Entry for @
You’ll point the IP Address that is found within the Manage Domains dialog in Azure to the@entry within the DNS records :

- Add a CNAME (Alias) Entry for www
You’ll point the address for your existing Azure Website (e.g. yoursite.azurewebsites.net) to thewwwentry within the DNS records. - Add a CNAME (Alias) Sub-domain Entry for awverify
You’ll need to create an alias under the sub-domain section calledawverifythat points to theawverifysub-domain for your site (e.g. awverify.yoursite.azurewebsites.net).
After adding all of these, your DNS records should look something like this :

It should take a few minutes for these changes to take effect. However after making them, you’ll now need to let Azure know that you will be pointing to this new domain as well. So return to the Manage Domains dialog within Azure and enter in your custom domain :

As mentioned, it can take a few minutes for Azure to recognize that the earlier DNS entries that were changed so be patient. After verifying your domain via a small green checkmark, you should be good to go!
You can try navigating directly to your site and you should be able to access it at your new domain as expected. If it doesn’t pop up right away, you can try explicitly refreshing your Azure Website or just waiting things out a bit until the DNS changes take effect.